Hey Chicks!
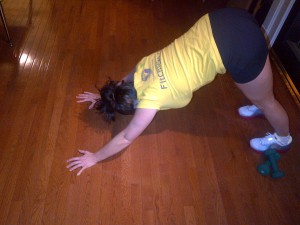
Today is all about how to get your Downward Dog on!
Are you feeling a little unbalanced, maybe dealing with cold hands and feet due to the super cool weather approaching here in Canada or perhaps just need a good stretch for your entire bod after your Bootcamp classes then you need to be trying this move on, like now!
What is Downward Facing Dog?
This is one of the most well-known Asana’s of the yoga world. Essentially it looks like an upside V and is said to be the resting pose in yoga, to help wipe the slate clean between poses and give you a chance to refocus your brain and bod before moving into the next sequence or movement.
Yoga or no yoga this move is super awesome to do because it can help alleviate stress in your day to day, it is known to help alleviate headaches and tension by elongating your spine and other benefits of doing a sweet downdog, it can also build up muscles in your entire backside of your body.
Extra Benefits of doing a Downward Facing Dog:
· Increase full body circulation
· Elongates shoulders and should blade areas
· Strengthens your hands, wrists, lower back and hamstring muscles
· Decrease back pain
· Stimulates nervous system which can help with memory and concentration
· Balances out your body
How to do a Fierce Downward Facing Dog:
This is always the move that seems to be like the one everyone and their mama thinks you just know since it is so commonly used and talked about. Here is the step by step though to be sure that you are getting the benefits out of it rather than just struggling through your upside down V stretch;)
STEP 1. Start in table top position – hands under shoulders, knees under hip joints
STEP 2. Push up into an inverted V – press hands into ground and hips up high to the sky
STEP 3. Feel like you are trying to place your heels down on the ground behind you while you evenly press the weight from hands and feet
STEP 4. Pull in through lower abs – use those transverse abdominals chicks!
STEP 5. Keep hips high, settle your shoulders away from your ears, I promise they do nothing for you up there and breathe
I know this seems simple enough but here is where peeps can sometimes go off the radar with this move and make it a super struggle:
· Always be sure your shoulders are “in” your body so not by your ears but instead connected so pull those shoulder blades down and in
· If your heels are touching the ground, step back a little you want to feel the stretch from your calves as well
· Spread fingers nice and wide on your mat so you have a lot of space rather than crunching it all up and adding stress to the body
· Relax your head that means like really relax. Let it go think of trying to look at your belly button instead of ahead of you or straight down, this will release your neck so you can align your spine a little more
· Feet are hip width apart, that is about 2 fists not the width of a yoga mat lol chicks your hips are not that big!!
OK I think that is it – I know it seems like a lot of info for a seemingly simple move but since this is a foundation piece to yoga and can be used daily just to get your blood flowing it is uber important that we are doing this one right!
Also being a foundation piece this is also one of my sweet moves that I like to use in my bootcamp classes as an added bonus, we take the basic move and then add a little bit of this and that to make it our own, to make it unique and to make it even more of a challenge!
So if you haven’t signed up for December 2 week bootcamp, make sure to do asap as we start again Monday and we will def be exploring thisamazing move 🙂
Have a FAB day!!
Amanda


